voidCPUFunction(){printf("This function is defined to run on the CPU.\n");}__global__voidGPUFunction(){printf("This function is defined to run on the GPU.\n");}intmain(){CPUFunction();GPUFunction<<<1/* # of thread blocks */,1/* # of threads per block*/>>>();cudaDeviceSynchronize();// 同步 GPU 和 CPU 的工作}
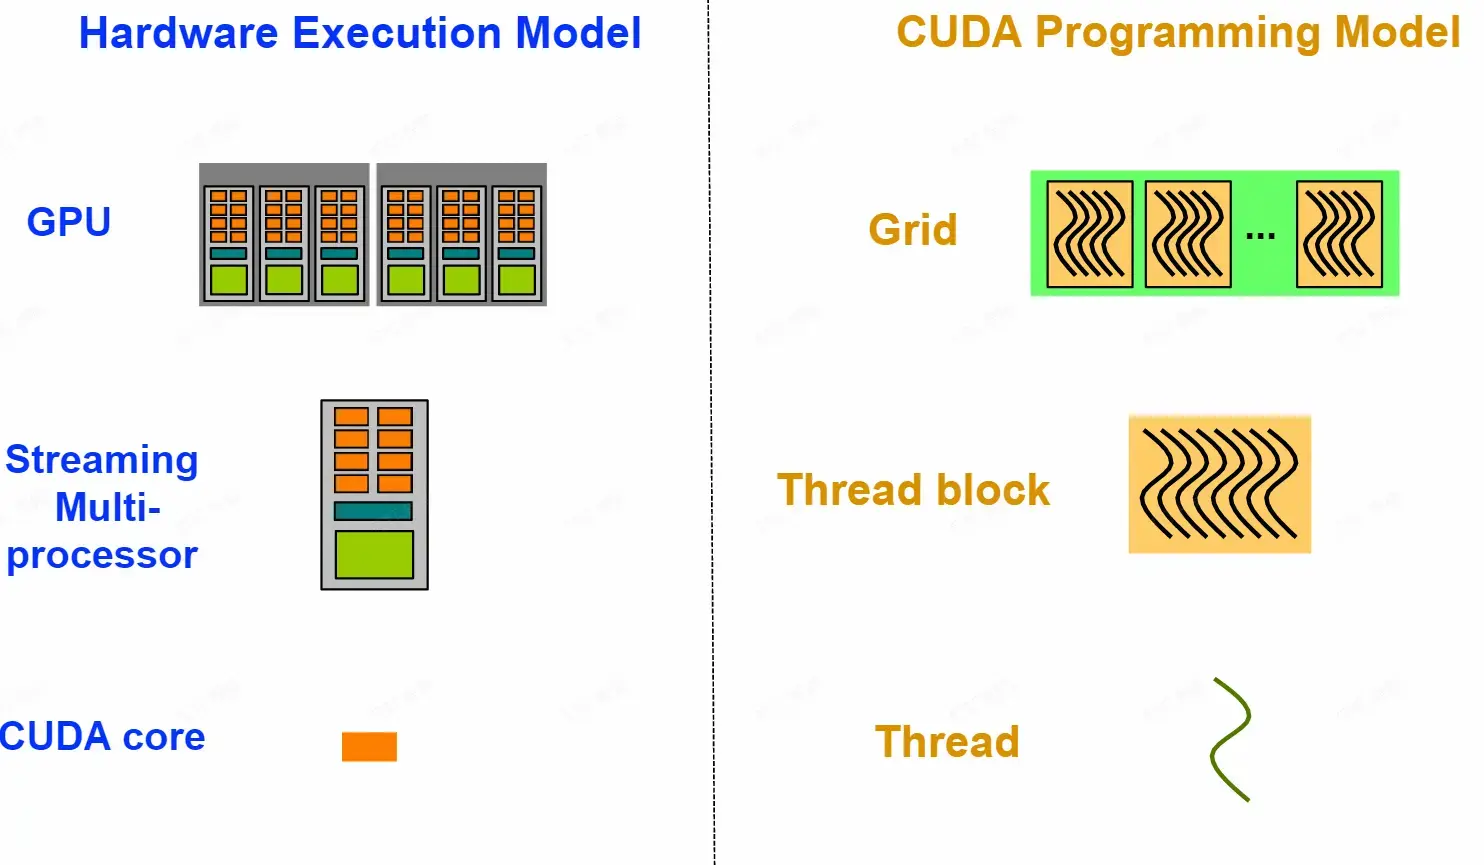
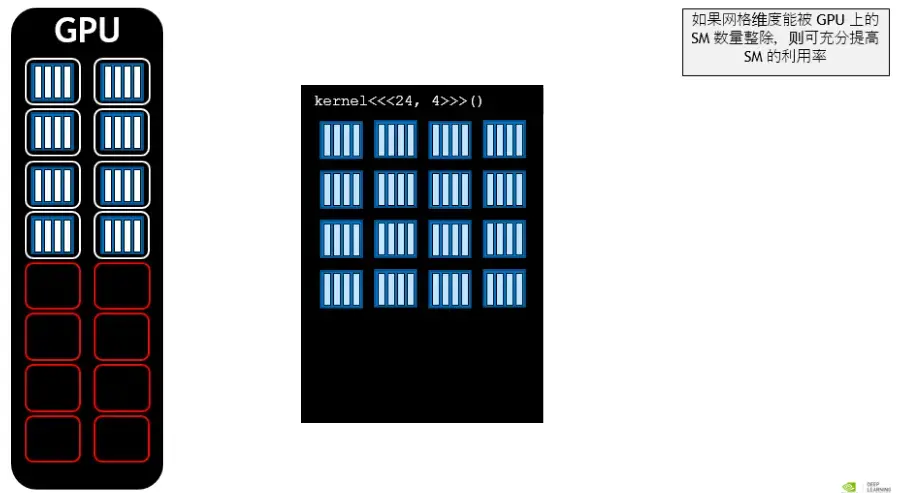
加速计算中的一些术语
__global__ void GPUFunction()
__global__ 关键字表明以下函数将在 GPU 上运行并可全局调用,而在此种情况下,则指由 CPU 或 GPU 调用。
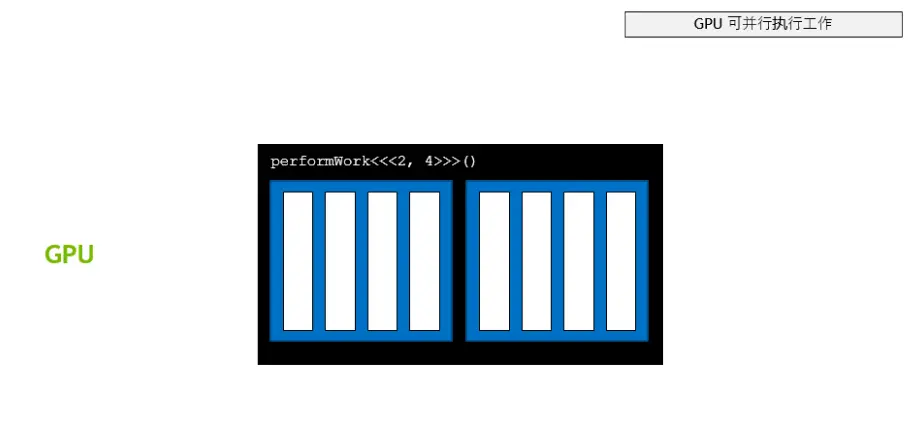
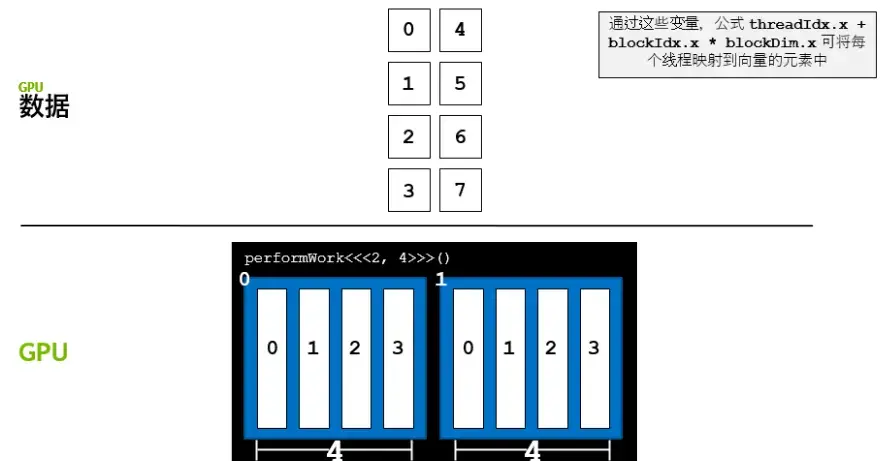
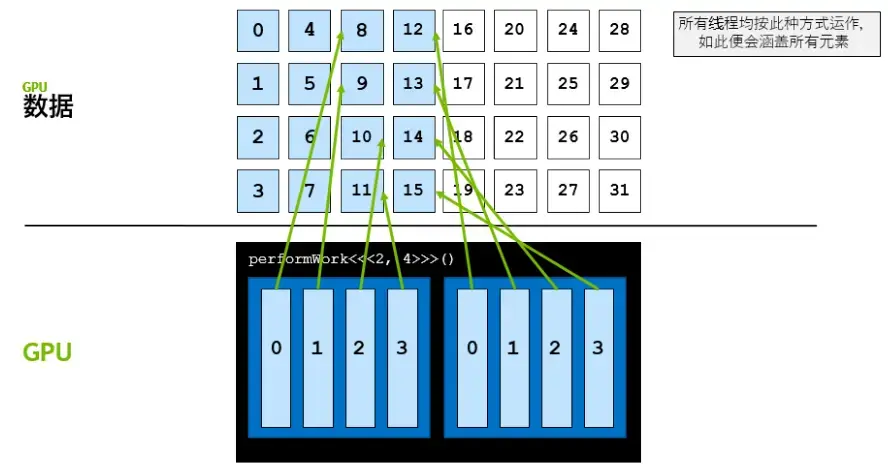
#include<stdio.h>__global__voidloop(intN){inti=threadIdx.x+blockIdx.x*blockDim.x;if(i<N)printf("This is iteration number %d\n",i);// 解决了网格大小和需求不匹配的问题}intmain(){intN=10;loop<<<2,10>>>(N);cudaDeviceSynchronize();}
intN=2<<20;size_tsize=N*sizeof(int);int*a;// Note the address of `a` is passed as first argument.cudaMallocManaged(&a,size);// Use `a` on the CPU and/or on any GPU in the accelerated system.cudaFree(a);
#include<stdio.h>voidinit(int*a,intN){inti;for(i=0;i<N;++i){a[i]=i;}}__global__voiddoubleElements(int*a,intN){inti;i=blockIdx.x*blockDim.x+threadIdx.x;if(i<N){a[i]*=2;}}boolcheckElementsAreDoubled(int*a,intN){inti;for(i=0;i<N;++i){if(a[i]!=i*2)returnfalse;}returntrue;}intmain(){intN=100;int*a;size_tsize=N*sizeof(int);cudaMallocManaged(&a,size);init(a,N);size_tthreads_per_block=10;size_tnumber_of_blocks=10;doubleElements<<<number_of_blocks,threads_per_block>>>(a,N);cudaDeviceSynchronize();boolareDoubled=checkElementsAreDoubled(a,N);printf("All elements were doubled? %s\n",areDoubled?"TRUE":"FALSE");cudaFree(a);}
__globalvoidkernel(int*a,intN){intindexWithinTheGrid=threadIdx.x+blockIdx.x*blockDim.x;intgridStride=gridDim.x*blockDim.x;for(inti=indexWithinTheGrid;i<N;i+=gridStride){// do work on a[i];}}
#include<stdio.h>voidinit(int*a,intN){inti;for(i=0;i<N;++i){a[i]=i;}}__global__voiddoubleElements(int*a,intN){intidx=blockIdx.x*blockDim.x+threadIdx.x;intstride=gridDim.x*blockDim.x;for(inti=idx;i<N;i+=stride){a[i]*=2;}}boolcheckElementsAreDoubled(int*a,intN){inti;for(i=0;i<N;++i){if(a[i]!=i*2)returnfalse;}returntrue;}intmain(){intN=10000;int*a;size_tsize=N*sizeof(int);cudaMallocManaged(&a,size);init(a,N);size_tthreads_per_block=256;size_tnumber_of_blocks=32;doubleElements<<<number_of_blocks,threads_per_block>>>(a,N);cudaDeviceSynchronize();boolareDoubled=checkElementsAreDoubled(a,N);printf("All elements were doubled? %s\n",areDoubled?"TRUE":"FALSE");cudaFree(a);}
cudaError_terr;err=cudaMallocManaged(&a,N)// Assume the existence of `a` and `N`.if(err!=cudaSuccess)// `cudaSuccess` is provided by CUDA.{printf("Error: %s\n",cudaGetErrorString(err));// `cudaGetErrorString` is provided by CUDA.}
/* * This launch should cause an error, but the kernel itself * cannot return it. */someKernel<<<1,-1>>>();// -1 is not a valid number of threads.cudaError_terr;err=cudaGetLastError();// `cudaGetLastError` will return the error from above.if(err!=cudaSuccess){printf("Error: %s\n",cudaGetErrorString(err));}
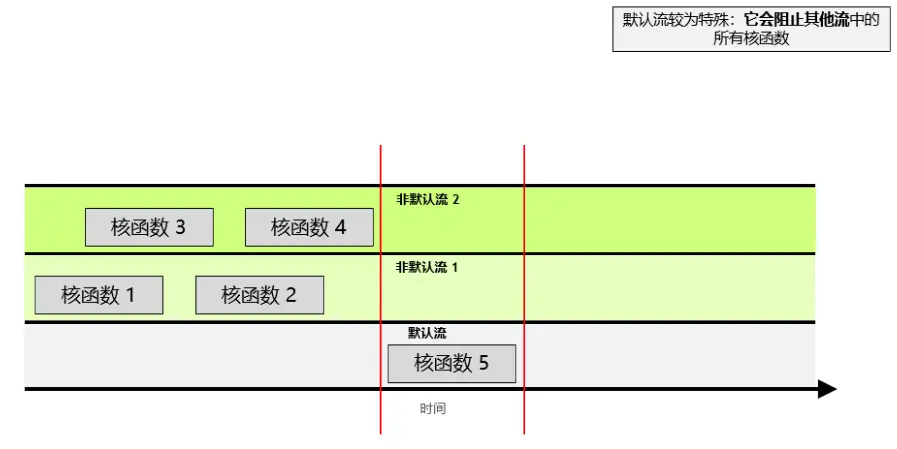
最后,为捕捉异步错误(例如,在异步核函数执行期间),请务必检查后续同步 CUDA 运行时 API 调用所返回的状态(例如 cudaDeviceSynchronize);如果之前启动的其中一个核函数失败,则将返回错误。
#include<stdio.h>voidinit(int*a,intN){inti;for(i=0;i<N;++i){a[i]=i;}}__global__voiddoubleElements(int*a,intN){intidx=blockIdx.x*blockDim.x+threadIdx.x;intstride=gridDim.x*blockDim.x;for(inti=idx;i<N+stride;i+=stride){a[i]*=2;}}boolcheckElementsAreDoubled(int*a,intN){inti;for(i=0;i<N;++i){if(a[i]!=i*2)returnfalse;}returntrue;}intmain(){/* * Add error handling to this source code to learn what errors * exist, and then correct them. Googling error messages may be * of service if actions for resolving them are not clear to you. */intN=10000;int*a;size_tsize=N*sizeof(int);cudaMallocManaged(&a,size);init(a,N);size_tthreads_per_block=2048;size_tnumber_of_blocks=32;cudaError_tsyncErr,asyncErr;doubleElements<<<number_of_blocks,threads_per_block>>>(a,N);syncErr=cudaGetLastError();asyncErr=cudaDeviceSynchronize();if(syncErr!=cudaSuccess)printf("Error: %s\n",cudaGetErrorString(syncErr));if(asyncErr!=cudaSuccess)printf("Error: %s\n",cudaGetErrorString(asyncErr));boolareDoubled=checkElementsAreDoubled(a,N);printf("All elements were doubled? %s\n",areDoubled?"TRUE":"FALSE");cudaFree(a);}
#include<stdio.h>#include<assert.h>inlinecudaError_tcheckCuda(cudaError_tresult){if(result!=cudaSuccess){fprintf(stderr,"CUDA Runtime Error: %s\n",cudaGetErrorString(result));assert(result==cudaSuccess);}returnresult;}intmain(){/* * The macro can be wrapped around any function returning * a value of type `cudaError_t`. */checkCuda(cudaDeviceSynchronize())}
intdeviceId;cudaGetDevice(&deviceId);// `deviceId` now points to the id of the currently active GPU.cudaDevicePropprops;cudaGetDeviceProperties(&props,deviceId);// `props` now has many useful properties about// the active GPU device.
#include<stdio.h>intmain(){/* * Device ID is required first to query the device. */intdeviceId;cudaGetDevice(&deviceId);cudaDevicePropprops;cudaGetDeviceProperties(&props,deviceId);intcomputeCapabilityMajor=props.major;intcomputeCapabilityMinor=props.minor;intmultiProcessorCount=props.multiProcessorCount;intwarpSize=props.warpSize;printf("Device ID: %d\nNumber of SMs: %d\nCompute Capability Major: %d\nCompute Capability Minor: %d\nWarp Size: %d\n",deviceId,multiProcessorCount,computeCapabilityMajor,computeCapabilityMinor,warpSize);}
#include<math.h>#include<stdio.h>#include<stdlib.h>#include"timer.h"#include"files.h"#define SOFTENING 1e-9f/* * Each body contains x, y, and z coordinate positions, * as well as velocities in the x, y, and z directions. */typedefstruct{floatx,y,z,vx,vy,vz;}Body;/* * Calculate the gravitational impact of all bodies in the system * on all others. */__global__voidbodyForce(Body*p,floatdt,intn){intidx=threadIdx.x+blockIdx.x*blockDim.x;intstride=blockDim.x*gridDim.x;for(inti=idx;i<n;i+=stride){floatFx=0.0f;floatFy=0.0f;floatFz=0.0f;for(intj=0;j<n;j++){floatdx=p[j].x-p[i].x;floatdy=p[j].y-p[i].y;floatdz=p[j].z-p[i].z;floatdistSqr=dx*dx+dy*dy+dz*dz+SOFTENING;floatinvDist=rsqrtf(distSqr);floatinvDist3=invDist*invDist*invDist;Fx+=dx*invDist3;Fy+=dy*invDist3;Fz+=dz*invDist3;}p[i].vx+=dt*Fx;p[i].vy+=dt*Fy;p[i].vz+=dt*Fz;}}intmain(constintargc,constchar**argv){intdeviceId;intnumberOfSMs;cudaGetDevice(&deviceId);cudaDeviceGetAttribute(&numberOfSMs,cudaDevAttrMultiProcessorCount,deviceId);// The assessment will test against both 2<11 and 2<15.// Feel free to pass the command line argument 15 when you gernate ./nbody report filesintnBodies=2<<11;if(argc>1)nBodies=2<<atoi(argv[1]);// The assessment will pass hidden initialized values to check for correctness.// You should not make changes to these files, or else the assessment will not work.constchar*initialized_values;constchar*solution_values;if(nBodies==2<<11){initialized_values="files/initialized_4096";solution_values="files/solution_4096";}else{// nBodies == 2<<15initialized_values="files/initialized_65536";solution_values="files/solution_65536";}if(argc>2)initialized_values=argv[2];if(argc>3)solution_values=argv[3];constfloatdt=0.01f;// Time stepconstintnIters=10;// Simulation iterationsintbytes=nBodies*sizeof(Body);float*buf;cudaMallocManaged(&buf,bytes);Body*p=(Body*)buf;cudaMemPrefetchAsync(p,bytes,deviceId);read_values_from_file(initialized_values,buf,bytes);doubletotalTime=0.0;/* * This simulation will run for 10 cycles of time, calculating gravitational * interaction amongst bodies, and adjusting their positions to reflect. */for(intiter=0;iter<nIters;iter++){StartTimer();/* * You will likely wish to refactor the work being done in `bodyForce`, * and potentially the work to integrate the positions. */cudaStream_tstream;cudaStreamCreate(&stream);intblockNum=nBodies/512;bodyForce<<<blockNum,512,0,stream>>>(p,dt,nBodies);// compute interbody forcescudaStreamDestroy(stream);/* * This position integration cannot occur until this round of `bodyForce` has completed. * Also, the next round of `bodyForce` cannot begin until the integration is complete. */cudaDeviceSynchronize();for(inti=0;i<nBodies;i++){// integrate positionp[i].x+=p[i].vx*dt;p[i].y+=p[i].vy*dt;p[i].z+=p[i].vz*dt;}constdoubletElapsed=GetTimer()/1000.0;totalTime+=tElapsed;}doubleavgTime=totalTime/(double)(nIters);floatbillionsOfOpsPerSecond=1e-9*nBodies*nBodies/avgTime;write_values_to_file(solution_values,buf,bytes);// You will likely enjoy watching this value grow as you accelerate the application,// but beware that a failure to correctly synchronize the device might result in// unrealistically high values.printf("%0.3f Billion Interactions / second",billionsOfOpsPerSecond);cudaFree(buf);}